
Ever found yourself staring at a half-full keg wondering if you can safely disconnect it without ruining the beer? You’re not alone. Whether you’re switching kegs at your home bar, need to move a keg for storage, or simply want to preserve that leftover beer for later, knowing how to properly untap a keg with beer still inside is crucial knowledge for any beer enthusiast.
The short answer? Yes, you absolutely can untap a keg with beer still in it – but only if you follow the right safety procedures and use proper CO2 pressure systems. Done incorrectly, you’ll end up with flat, oxidized beer that tastes more like disappointment than your favorite brew.
This comprehensive guide will walk you through everything you need to know about safely untapping kegs, preserving beer quality, and avoiding common mistakes that can ruin your investment.
Understanding Keg Systems and Why CO2 Matters
Before diving into the untapping process, it’s essential to understand why CO2 is your best friend when dealing with kegs containing beer.
The Science Behind CO2 Preservation
Carbon dioxide isn’t just what makes your beer fizzy – it’s what keeps it fresh. During fermentation, yeast naturally produces CO2, which dissolves into the beer and creates that satisfying carbonation we all love. When you maintain proper CO2 pressure in your keg system, you’re essentially creating a protective barrier that prevents oxidation and maintains carbonation levels.
The brewing industry spends millions of dollars keeping oxygen away from beer during production and storage. Oxygen is beer’s enemy, causing off-flavors, stale tastes, and that cardboard-like flavor that signals your beer has gone bad.
Why Air Compressors Are a No-Go
Some people think they can save money by using compressed air instead of CO2. This is a mistake that will cost you more in ruined beer than you’ll ever save on gas. Here’s why:
- Contamination risks: Air compressors often contain oil residue that mixes with the air
- Oxygen exposure: Air contains roughly 21% oxygen, which will quickly oxidize your beer
- Inconsistent pressure: Air compressors don’t provide the steady, controlled pressure needed for proper beer dispensing
Proper CO2 Pressure Guidelines
For most domestic beers stored at 38°F, the recommended CO2 pressure ranges from 12-14 PSI. This pressure maintains the brewery’s specified carbonation level and ensures optimal taste and mouthfeel.
As a general rule of thumb:
- 1/4 lb of CO2 dispenses approximately 1/4 barrel of beer
- 1/2 lb of CO2 dispenses approximately 1/2 barrel of beer
- A 5 lb CO2 cylinder can dispense 18-20 quarter barrels or 9-10 half barrels
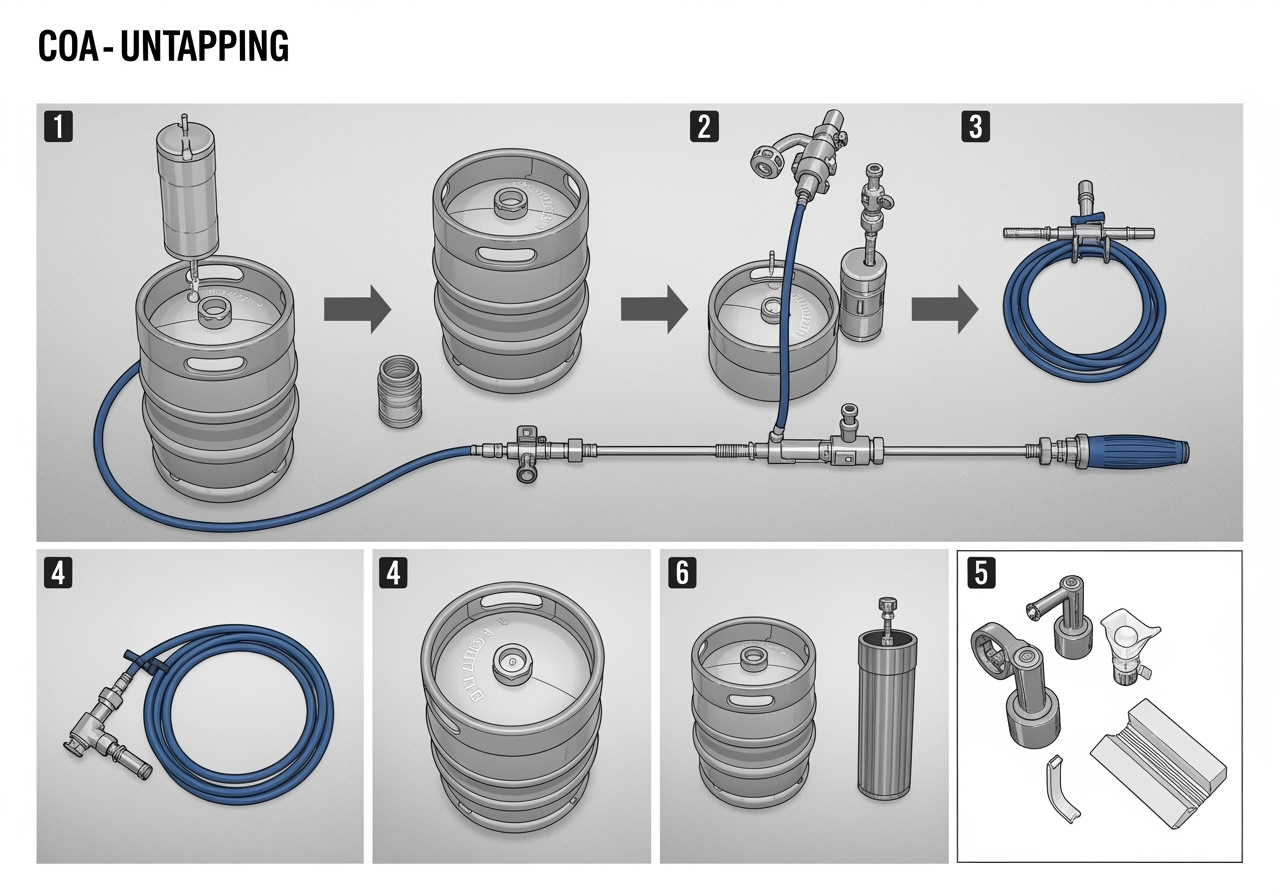
Step-by-Step Guide: How to Safely Untap a Keg With Beer
Now that you understand the importance of CO2, let’s walk through the proper procedure for untapping a keg with beer still inside. This process requires patience and attention to detail – rushing through these steps is the quickest way to end up with flat beer and a messy cleanup.
Pre-Untapping Preparation
Before you even touch your keg system, proper preparation sets you up for success. Think of this like a pilot’s pre-flight checklist – skipping steps leads to problems.
Safety First Assessment:
- Ensure you have adequate lighting in your work area
- Clear the space around your keg of any obstacles
- Have a towel ready for any minor spills
- Check that your CO2 tank has adequate pressure (should read above 500 PSI)
- Verify the keg has been sitting undisturbed for at least 30 minutes
Temperature Check: Your keg should be at proper serving temperature (36-38°F) before untapping. If the keg is too warm, you’ll get excessive foaming during the process. Use a thermometer or simply feel the keg – it should be cold to the touch but not frozen.
What You’ll Need (Detailed Equipment List)
Essential Equipment:
- CO2 system (tank, regulator, and lines) – Must be food-grade CO2, not industrial grade
- Clean towels – At least 2-3 lint-free towels for cleanup
- Sanitizing solution (Star-San or similar no-rinse sanitizer recommended)
- Proper keg coupler for your specific keg type (Sankey D-type for most domestic kegs)
Optional but Helpful Tools:
- Keg cap or cover – To protect the valve after untapping
- Pressure gauge – To verify system pressure before starting
- Flashlight or headlamp – For better visibility in tight spaces
- Rubber gloves – For better grip and hygiene
- Keg dolly – If you need to move the keg after untapping
Keg Coupler Types Guide: Different breweries use different valve systems. Here’s what you need to know:
- Sankey D-Type: Most common for domestic beers (Budweiser, Coors, Miller)
- European Sankey: Used by many imported beers (Heineken, Stella Artois)
- Guinness U-Type: Specifically for Guinness and some other stouts
- German A-Type: Used by some German imports
- American Basic: Older system, less common today
Step 1: Turn Off the CO2 Supply (Detailed Process)
This is your most critical safety step. Never skip or rush through this.
Locate Your CO2 Tank: Your CO2 tank should be easily accessible and clearly labeled. The main shutoff valve is typically located at the top of the tank where the regulator connects.
Proper Shutdown Sequence:
- Turn the main tank valve clockwise until it stops – this should require only moderate force
- Check your regulator gauge – the high-pressure gauge should maintain its reading, but the low-pressure gauge should drop to zero as you use the remaining gas in the lines
- Listen for silence – you should no longer hear any hissing or gas flow sounds
Visual Confirmation: Your regulator’s low-pressure gauge should read zero PSI within 30-60 seconds of shutting off the main valve. If it doesn’t, you may have a leak in your system that needs addressing before proceeding.
Common Mistakes to Avoid:
- Don’t turn the valve too hard – CO2 valves can be damaged by over-tightening
- Don’t confuse the regulator adjustment knob with the main shutoff valve
- Don’t proceed if you still hear gas flowing after shutoff
Step 2: Release System Pressure (Complete Depressurization)
Even with the CO2 supply turned off, your system still contains pressurized gas that must be safely released.
Method 1: Using the Pressure Relief Valve If your coupler has a built-in pressure relief valve (a small button or lever):
- Press the relief valve slowly – don’t jam it down quickly
- Listen for the hiss – you should hear gas escaping for 5-10 seconds
- Watch your gauges – both regulator gauges should drop to zero
- Test the valve – press it again to ensure no more gas escapes
Method 2: Using the Tap Faucet If you don’t have a pressure relief valve:
- Open your tap faucet fully – pull the handle all the way forward
- Allow gas and foam to escape – this may take 30-60 seconds
- Watch for the flow to stop – when no more gas or liquid comes out, the system is depressurized
- Close the faucet – push the handle back to the closed position
Safety Note: Some foam and beer may come out during depressurization. This is normal and expected. Have your towels ready.
Step 3: Unlock the Coupler (Detailed Unlocking Process)
The coupler locking mechanism is your safety device that prevents accidental disconnection under pressure.
Identifying Your Locking Mechanism: Most couplers use one of these locking systems:
- Lever-style lock: A plastic or metal handle that pulls outward
- Twist-lock: A collar that rotates to unlock
- Push-button lock: A button that must be depressed while lifting
Proper Unlocking Technique:
- Grip the coupler firmly with your non-dominant hand
- Locate the locking handle – it’s usually brightly colored for easy identification
- Pull the handle straight out – don’t twist or angle it
- Feel for the click – most locks have a tactile feedback when disengaged
- Keep the handle pulled out – don’t let it snap back while proceeding to the next step
Troubleshooting Stuck Locks: If the lock won’t budge:
- Check for remaining pressure – go back to Step 2 and ensure complete depressurization
- Clean around the mechanism – beer residue can cause sticking
- Apply gentle penetrating oil – food-safe lubricant only
- Don’t force it – excessive force can break the locking mechanism
Step 4: Disengage the Coupler (Proper Lifting Technique)
With the lock disengaged, you can now safely remove the coupler from the keg valve.
Standard Lifting Procedure:
- Maintain your grip on the coupler body with one hand
- Keep the locking handle pulled out with your other hand
- Lift straight up – don’t angle or twist the coupler
- Apply steady, even pressure – the coupler should lift off easily
- Listen for the valve closure – you should hear a soft “click” as the keg’s internal valve closes
Special Considerations for Different Coupler Types:
For Quarter-Turn Couplers:
- Lift slightly while maintaining downward pressure
- Rotate counterclockwise approximately 90 degrees
- Continue lifting once the rotation is complete
For Bayonet-Style Couplers:
- Press down slightly to compress the spring mechanism
- Rotate counterclockwise until the tabs align with the slots
- Lift straight up once aligned
Visual Inspection During Removal: As you lift the coupler, check for:
- Clean valve surface – no debris or damage
- Proper seal closure – the keg valve should close completely
- No beer leakage – a properly functioning valve won’t leak
Step 5: Remove the Coupler Completely (Final Disconnection)
The final step ensures complete separation and proper valve sealing.
Complete Removal Process:
- Continue lifting until the coupler is completely free from the keg
- Check the keg valve – it should be flush with the keg top and sealed
- Inspect the coupler probe – look for any damage or excessive wear
- Test the valve seal – gently press on the keg valve to ensure it’s closed
Post-Removal Valve Check: A properly sealed keg valve should:
- Sit flush with the keg top
- Show no signs of beer leakage
- Feel firm when gently pressed
- Make no hissing sounds
Signs of Valve Problems: If you notice any of these issues, the keg may need professional attention:
- Continuous beer leakage from the valve
- Valve that won’t close completely
- Damaged or bent valve components
- Excessive foam or pressure release
Step 6: Clean and Store (Proper Equipment Maintenance)
Proper cleaning and storage of your equipment ensures longevity and prevents contamination.
Immediate Coupler Cleaning:
- Rinse with warm water – remove any beer residue immediately
- Inspect all seals – look for wear, damage, or buildup
- Clean the probe – use a bottle brush to remove any deposits
- Sanitize if desired – spray with no-rinse sanitizer and air dry
Keg Valve Protection:
- Wipe the valve area with a clean, damp towel
- Check for damage – look for dents, scratches, or debris
- Cover the valve – use a clean cap, towel, or plastic wrap
- Label if storing – note the date and contents for future reference
System Storage Best Practices:
For Short-Term Storage (1-7 days):
- Leave CO2 connected but turned off
- Store coupler in a clean, dry location
- Keep keg refrigerated and covered
- Check daily for any leaks or issues
For Long-Term Storage (1+ weeks):
- Disconnect and thoroughly clean all components
- Store coupler with protective caps on connections
- Consider purging keg with CO2 before sealing
- Document storage date and conditions
Equipment Inspection Schedule:
- After each use: Basic cleaning and visual inspection
- Weekly: Detailed cleaning of all components
- Monthly: Replace worn seals and gaskets
- Quarterly: Professional inspection of CO2 system
Post-Untapping Quality Assurance
After successfully untapping your keg, take these final steps to ensure everything went smoothly:
Immediate Checks:
- No leaks: Check around the keg valve for any beer seepage
- Proper seal: The valve should be completely closed
- Clean workspace: Wipe up any spills immediately
- Equipment secured: Store all tools properly
Quality Monitoring: When you retap the keg, watch for:
- Normal carbonation levels: Beer should pour with appropriate fizz
- Clean taste: No off-flavors from oxidation
- Proper foam: Normal head formation and retention
- Clear appearance: No unusual cloudiness or particles
Safety Considerations and Common Mistakes
Pressure-Related Safety Tips
Never attempt to remove a coupler from a pressurized keg. Always ensure the system is depressurized first. A pressurized keg can spray beer forcefully, creating a mess and potential safety hazard.
Use proper lifting techniques. Full kegs can weigh 160+ pounds. Always use a dolly or get help when moving kegs to prevent injury.
Check for leaks regularly. Inspect your CO2 lines, connections, and regulator for leaks that could affect pressure and beer quality.
Common Untapping Mistakes
Rushing the process: Taking shortcuts often leads to spilled beer and contamination. Follow each step methodically.
Ignoring cleanliness: Always clean your equipment between uses to prevent bacterial contamination.
Wrong coupler type: Different keg brands use different valve systems. Make sure you’re using the correct coupler for your keg.
Preserving Beer Quality After Untapping
Short-Term Storage (1-7 Days)
If you plan to retap the keg within a week, proper storage is crucial:
- Keep the keg refrigerated below 38°F
- Store in a dark location away from light
- Avoid temperature fluctuations
- Don’t move the keg unnecessarily
Long-Term Storage (1-4 Weeks)
For longer storage periods:
- Maintain consistent refrigeration
- Consider purging the keg with CO2 before sealing if you have the equipment
- Monitor for any signs of contamination when you retap
- Use within 30 days for best quality
Signs Your Beer Has Gone Bad
Watch for these indicators that your stored beer may have deteriorated:
- Off-flavors (cardboard, metallic, or sour tastes)
- Unusual cloudiness or haziness
- Lack of carbonation
- Strange odors when opening the keg
Troubleshooting Common Draft Beer Issues
Foamy Beer Problems
Symptoms: Excessive foam, little liquid in your glass
Causes and Solutions:
- Too much pressure: Reduce CO2 pressure gradually and draw a few foamy pints to rebalance
- Warm beer: Ensure keg temperature is below 38°F
- Dirty lines: Clean your draft lines with appropriate cleaning solution
- Improper pouring technique: Pour at a 45-degree angle, straightening as the glass fills
Flat Beer Issues
Symptoms: No carbonation, lifeless beer
Causes and Solutions:
- Too little pressure: Increase CO2 pressure to recommended levels
- System leaks: Check all connections for CO2 leaks
- Old beer: Beer may have been stored too long or improperly
- Temperature fluctuations: Maintain consistent cold temperatures
Cloudy or Hazy Beer
Symptoms: Beer appears murky or unclear
Causes and Solutions:
- Bacterial contamination: Clean and sanitize all equipment thoroughly
- Temperature shock: Allow keg to stabilize at proper temperature
- Sediment disturbance: Let keg settle before serving
- Line contamination: Replace or thoroughly clean beer lines
Advanced Tips for Keg Management
Rotating Multiple Kegs
If you’re managing multiple kegs:
- Label kegs with tapping dates
- Use a first-in, first-out rotation system
- Keep detailed records of each keg’s condition
- Plan your consumption to minimize waste
Cleaning and Maintenance Schedule
After each keg:
- Clean and sanitize coupler
- Inspect lines for wear or contamination
- Check CO2 levels and connections
Monthly:
- Deep clean all draft lines
- Calibrate CO2 regulator
- Inspect all seals and gaskets
Quarterly:
- Professional line cleaning (if applicable)
- Replace worn components
- Test system pressure accuracy
Frequently Asked Questions
Q: How long can I leave a keg untapped with beer still in it? A: With proper refrigeration and CO2 pressure, an untapped keg can maintain quality for 30-45 days. Without CO2 pressure, consume within 8-12 hours to avoid significant quality loss.
Q: Can I untap a keg and retap it later without affecting the beer? A: Yes, as long as you maintain proper CO2 pressure and sanitary conditions. The beer quality should remain largely unchanged if done correctly.
Q: What happens if I untap a keg without CO2 pressure? A: The beer will begin to go flat immediately and will oxidize quickly, developing off-flavors within hours. It’s best to consume the beer immediately in this situation.
Q: Is it safe to transport an untapped keg with beer in it? A: Yes, but ensure the keg is properly sealed and transported upright. Allow it to settle for several hours before retapping to prevent excessive foaming.
Q: Can I use a hand pump system to retap a keg? A: While possible, hand pumps introduce air (oxygen) into the system, which will cause the beer to deteriorate quickly. CO2 systems are strongly recommended for maintaining beer quality.
Q: How do I know if my CO2 pressure is correct? A: Proper pressure results in beer that pours smoothly with a creamy head and maintains carbonation. Too much pressure creates excessive foam; too little results in flat beer.
Conclusion
Successfully untapping a keg with beer still inside isn’t complicated, but it does require attention to detail and proper equipment. The key is maintaining CO2 pressure throughout the process and following proper sanitation procedures.
Remember these essential points:
- Always use CO2 systems, never compressed air
- Maintain proper pressure (12-14 PSI for most beers at 38°F)
- Keep everything clean and sanitized
- Store untapped kegs properly in refrigerated conditions
- Monitor beer quality and consume within recommended timeframes
With these techniques, you can confidently manage your keg systems, preserve beer quality, and avoid waste. Whether you’re running a home bar or just want to enjoy draft beer at its best, proper keg management makes all the difference.
Ready to upgrade your draft beer setup? Check out our comprehensive guides on choosing the right CO2 system and building the perfect home kegerator for your needs.